Latest Posts

Search Service Application - Manage Content Sources

The most important part of configuring search service application is Managing Content Sources. This option is used to Add, Edit or Delete content sources. Follow this article to get insights into updating any parameter related to Content Source.

The step-by-step process of configuring content sources in search service application

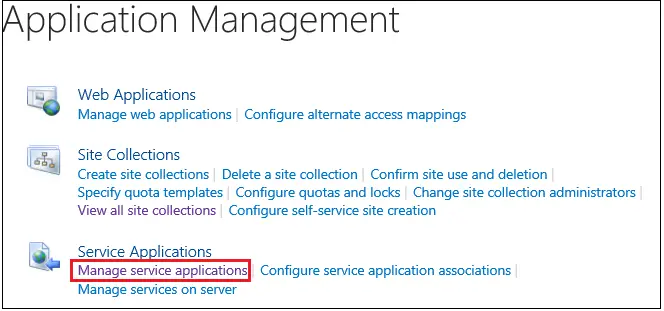
  1. Go to Central administration >> Application Management >> Manage service applications
  2. Manage service application navigation
  3. Click on your Search service application
  4. Search Service application navigation
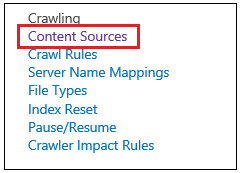
  5. On the left-hand side of the page >> click on Content Sources
  6. Content Sources Navigation
  7. You will find an existing content source over here. When you create a new search service application, you will find a content source, Local SharePoint sites already created. You can create New Content Source or Edit Existing Content Source.
  8. Manage Content Sources Page
  9. Click on the content source name page to modify the content source.
    • Name: Enter the content source name over here. Default content source will have the name “Local SharePoint sites”. You can create a new content source.
    • Content Source Name
    • Content Source Type: Select Type of content to be crawled
    • Content Source Type
      1. SharePoint Sites: You can include SharePoint sites from the same farm or different farm
      2. Web sites: Other web content in the organization and content that is on web site on the internet
      3. File Shares: Content on a file share in the organization.
      4. Exchange Public Folders: Content in Exchange server public folders
      5. Line of Business data: Use this for database, web service and BCS connectors
      6. Custom Repository: Use this content source for .net and custom BCS indexing
    • Start Addresses: Enter the site collection URLs over here that you want to include in this content source. You can add multiple sites. You can also add the Web Application URL, which will include all the site collections of the Web Application in crawling.
    • Content Source Start Addresses
    • Crawl Settings: This setting is used to specify the behavior of crawling. Note: This setting is enabled only at the time of creating the content source, later when you edit the content source, this setting will be disabled so if you want to change this, you will have to re-create the content source.
      1. Option 1: Crawl everything under the hostname for start address – This option accepts only hostname (http://servername) as the start address. You cannot enter subsite URL for this option.
      2. Option 2: Only crawl the Site Collection of each start address – You can write any URL here but the crawl will start from the top-level site collection of the URL you have specified. e.g. If you write address, http://servername/sites/finance/payment. Now, this is subsite URL but for this option, it will crawl from the top-level site (http://servername/sites/finance) and all its subsites. 
      3. Content Source Crawl Settings
    • Crawl Schedules: This setting is used to select the crawl schedule for this content source. Content Source Crawl Schedules
      1. Enable Continuous Crawls: Continuous crawl will work with content and provide the most recent content in search. A few details about Continuous crawl is listed below.
        • By default, continuous crawl runs every 15 mins
        • Continuous crawl works only with content source type: SharePoint Sites
        • Multiple continuous crawls can perform simultaneously. So Even if the existing crawl is scanning a large update, another continuous crawl can start at a defined time and perform scan on rest of the updates.
        • Once the continuous crawl is enabled, you cannot stop or pause it, you can only disable the crawl.
        • You can change the continuous crawl interval only using Microsoft Power Shell.
    • Enable incremental Crawls: Crawls only the content which was created, modified, deleted since the last crawl. By default, incremental crawl runs every 4 hours.

      Below is the process to create a new schedule for Incremental crawl.

      1. Click on Create Schedule as shown in below image.
      2. Content Source enable incremental crawl
      3. A pop-up will open. You can specify crawl Daily, Weekly or Monthly. You can explore various options given in this Manage Schedules option box
      4. Content Source Manage Schedules
      5. After specifying the type and settings of the schedule, you can click on “OK”. You can see your created schedule in the drop-down as shown below. You can select the option you want.
      6. Content Source Schedule created
    • Full Crawl: In full crawl, the search engine crawls, process and indexes each and every bit of content irrespective of earlier crawls.

      You can set a new schedule for Full crawl the same way you did for Incremental crawl (specified in above steps)

    • Content Source Priority: Select the priority of the content source. The search engine crawl system will prioritize the processing of 'High' priority content sources over 'Normal' priority content sources.
    • Content Source Priority

Conclusion

We went through a detailed process of configuring the content source. This article was written on SharePoint 2013.


We value your Feedback:

Page URL:

Name:

Email:


Suggestion:

© 2024 Code SharePoint