In this tutorial, we are going to learn how we can customize Classic SharePoint forms (Create, Edit, and View). We will also see how we can apply CSR using JSLink in these forms and customize them programmatically.
- Open Your List or library in SharePoint classing mode
- In Ribbon, click on List / Library
- Expand Form Web Parts. Here you can see three options.
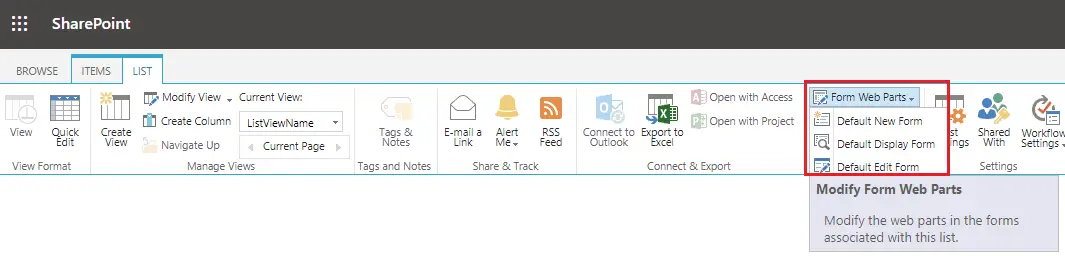
- You can customize any form. We will explain about Default Edit Form. In the same way, you can customize the other two.
- Now, from Ribbon, click on the Default Edit Form.
- Your SharePoint list will open with all the fields.
- Edit the page
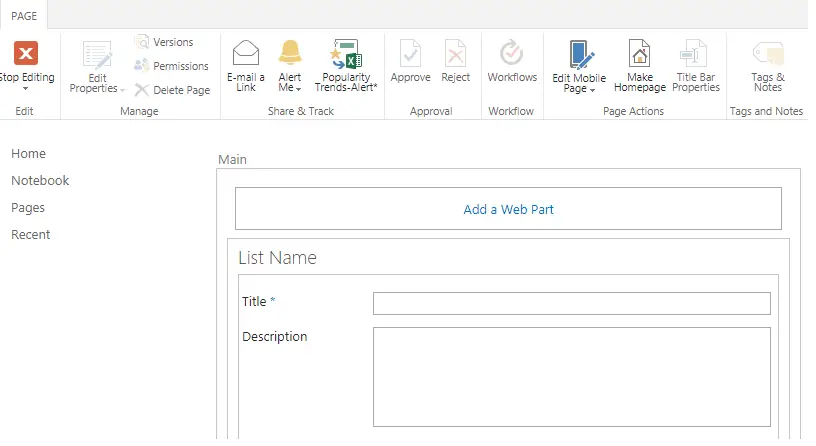
- You will see a web part zone is visible at the top of the form. Where you can add your web part to customize the form.
- I have added two web parts. You can just change the zone index from web part properties and change the display position of the web part after adding it to the page.
- This is how I modified the Edit form by adding two Content Editor Web parts.
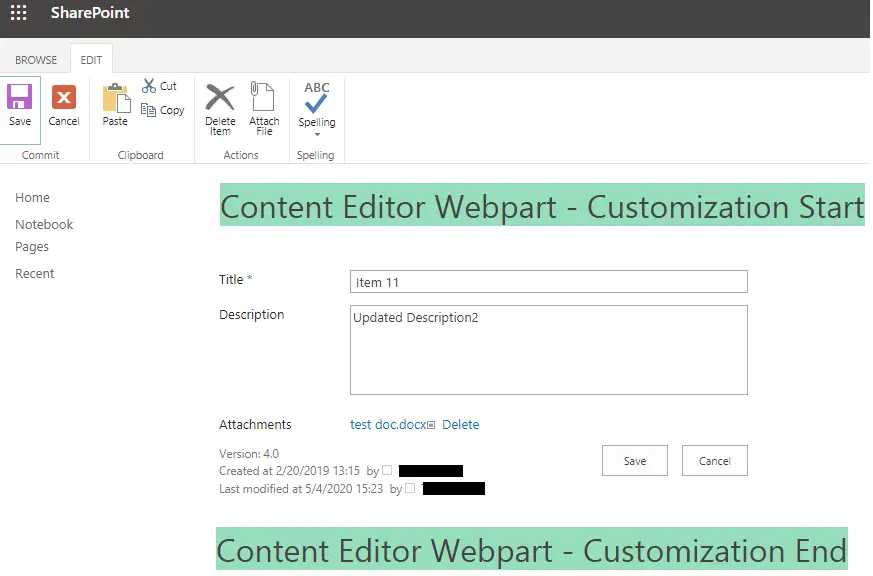
- You cannot place web parts in between the fields.
- You can customize according to your requirement. You can place images, links, or any other web part that you want.
- In the same way, you can also use SharePoint designer to customize these forms.
- Open your Site in SharePoint designer
- Click on List and Libraries from the Left-hand side Navigation.
- Now select your list from the right-side panel.
- This panel will open multiple sections.
- Go to the Forms section.
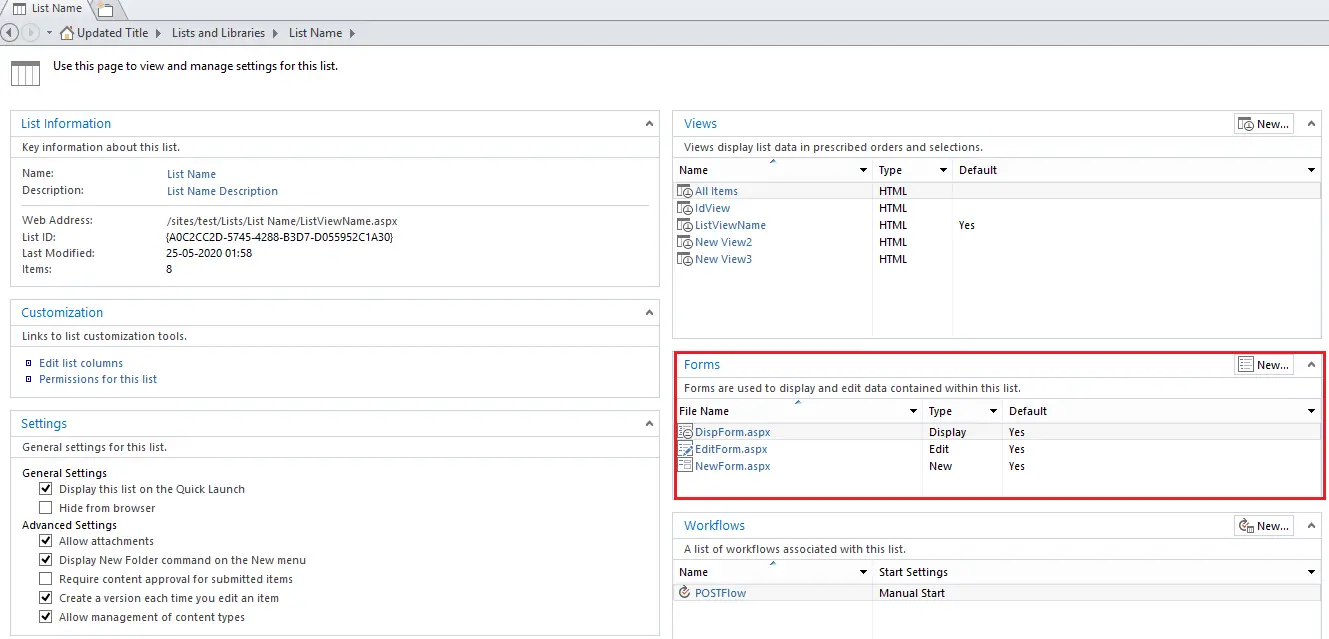
- Now you can customize any of the forms listed here.
Customizing SharePoint forms are a bit different than Customizing SharePoint List view web part using Client-side Rendering (CSR) and JSLink.
- We will consider Edit and View form customization in this example.
- You can go back to editing the form from List >> Edit the page and edit the web part properties.
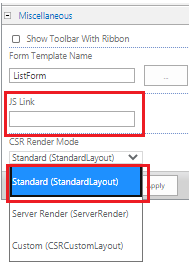
- JS Link will hold the JavaScript file link. Put your JS file reference here.
- CSR Render Mode: There are three options.
- Standard: You can only update the right-hand side i.e. value boxes of all the fields, not the labels. You will only be able to use Field, PreRender and PostRender events
- Server Render: This option is used for XSLT web part
- Custom: We found some issues while using this option, so in this article, we haven’t included this but you can use all the CSR functions using this option.
- We are going to select Standard here
Edit the JavaScript file, referenced in JSLink for Client-Side rendering
Called only one time for a field in the page load sequence
- Field – For each field, you will have to call this separately.
Additional events for customization. Called multiple times i.e. for each field these functions will trigger
- Onprerender – This will be fired for each field on the page
- OnPostRender - This will be fired for each field on the page
Main API to use CSR is:
SPClientTemplates.TemplateManager.RegisterTemplateOverrides(overrideCtx)
Register All the Events
-
// Assign a function to handle the PreRender
events
-
overrideCtx.OnPreRender = preRenderHandler;
-
-
// Field
-
// Here three methods are defined for three
different forms. (1) New (2) Edit (3) View
-
overrideCtx.Templates.Fields = {
-
"Title":
-
{
EditForm: TitleEdit,
-
NewForm: TitleNew,
-
DisplayForm: TitleDisplay
-
}
-
};
-
-
// Assign a function to handle the
PostRender events
-
overrideCtx.OnPostRender = postRenderHandler;
- Here, we are going to customize Title field on the Edit and View Form.
CSR API explanation
(1) Field - overrideCtx.Templates.Fields
1. When page renders in list item View Mode.
-
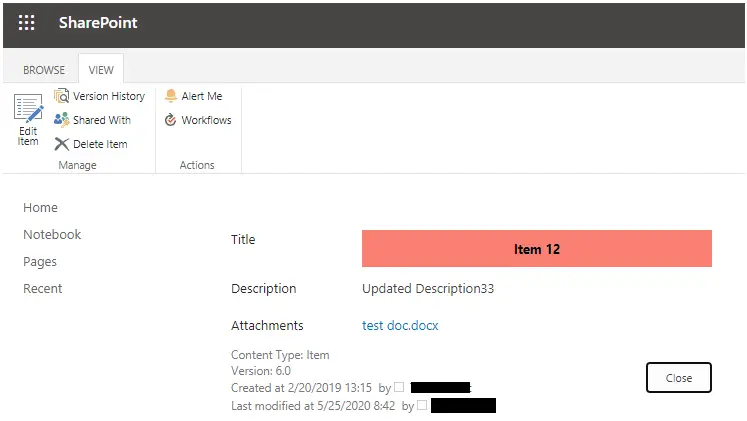
function TitleDisplay(ctx) {
-
var returnhtml = '';
-
returnhtml += "<div style='color:
black;padding:10px;background-color: salmon;text-align: center;font-weight:
bold;'>" + ctx.CurrentItem.Title + "</div>";
-
return returnhtml;
-
}
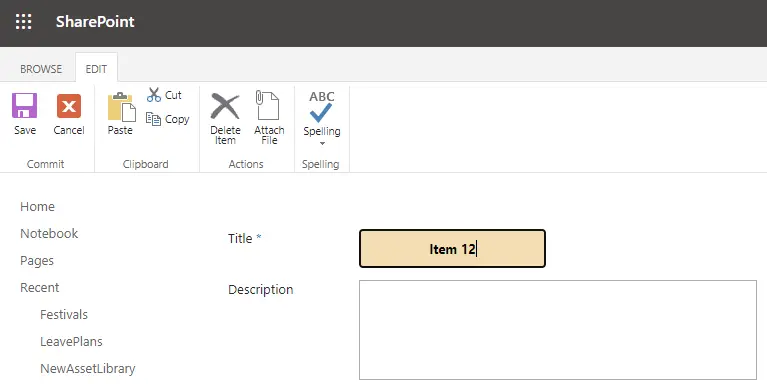
2. When the page renders in List item Edit or New mode
-
function TitleEdit(ctx) {
-
// Fetch column name from the context
-
var columnName = ctx.CurrentFieldSchema.Name;
-
var controlId = columnName +
"_control";
-
-
// Here we are attaching a "textbox-value change
event". Due to this, when you change the value of this field, the SharePoint will update new value, instead of retaining the old value.
-
ctx.FormContext.registerInitCallback(columnName, function () {
-
$addHandler($get(controlId), "change",
function (e) {
-
ctx.FormContext.updateControlValue(columnName, $get(controlId).value);
-
});
-
});
-
-
// return Input control with customization
-
return String.format('<input
type="text" id="{0}" name="{0}" value="{1}" class="my-input" style="color:
black;padding:10px;background-color: wheat;text-align: center;font-weight:
bold;" />', controlId, ctx.CurrentItem.Title);
}
(2) OnPreRender - overrideCtx.OnPreRender
This event fires before the DOM is loaded. Generally, we use this method to call any other methods or to check for any validation, the results of which, we can use in other overriding methods.
(3) OnPostRender - overrideCtx.OnPostRender
This event fires after the DOM is loaded. This is a very essential method when you want to manipulate something which is loaded on DOM. You can also use this method directly to manipulate the fields loaded on the DOM.
Full Code
-
// Function to handle custom client side
rendering on pages
-
(function () {
-
// Initialize the variable that stores the
objects.
-
var overrideCtx = {};
-
overrideCtx.Templates = {};
-
-
// Assign a function to handle the PreRender
events
-
overrideCtx.OnPreRender = preRenderHandler;
-
-
// Field
-
// Here three methods are defined for three different forms. (1) New (2) Edit (3) View
-
overrideCtx.Templates.Fields = {
-
"Title":
-
{ EditForm: TitleEdit,
-
NewForm: TitleNew,
-
DisplayForm: TitleDisplay
-
}
-
};
-
-
// Assign a function to handle the PostRender
events
-
overrideCtx.OnPostRender = postRenderHandler;
-
-
// Register the template overrides.
-
SPClientTemplates.TemplateManager.RegisterTemplateOverrides(overrideCtx);
-
-
// Handle Edit page field customization
-
function TitleEdit(ctx) {
-
-
// Fetch column name from the context
-
var columnName =
ctx.CurrentFieldSchema.Name;
-
var controlId = columnName +
"_control";
-
-
// Here we are attaching a "textbox-value
change event". Due to this, when you change the value of this field, the
SharePoint will update new value, instead of retaining the old value.
-
ctx.FormContext.registerInitCallback(columnName,
function () {
-
-
$addHandler($get(controlId), "change",
function (e) {
-
ctx.FormContext.updateControlValue(columnName, $get(controlId).value);
-
});
-
});
-
-
return String.format('<input type="text" id="{0}" name="{0}" value="{1}"
class="my-input" style="color: black;padding:10px;background-color:
wheat;text-align: center;font-weight: bold;" />', controlId,
ctx.CurrentItem.Title);
-
}
-
-
// Handle New page field customization
-
function TitleNew(ctx) {
-
-
}
-
-
// Handle View page field customization
-
function TitleDisplay(ctx) {
-
var returnhtml =
'';
-
returnhtml += "<div style='color:
black;padding:10px;background-color: salmon;text-align: center;font-weight:
bold;'>" + ctx.CurrentItem.Title + "</div>";
-
return returnhtml;
-
}
-
-
// Function to attend the OnPreRender event. The event will fire for each field on the page
-
function preRenderHandler() {
-
console.log('CSR Pre-render event');
-
}
-
-
// Function to attend the OnPostRender event. The event will fire for each field on the page
-
function postRenderHandler() {
-
console.log('CSR Post-render event');
-
}
-
})();
Reference is taken from the article: SharePoint 2013 Client Side Rendering: List Forms