Many times we come across requirements to filter data from list-view, uploaded on the page. Most of the developers start applying custom logic to filter the data. SharePoint provides a variety of OOB filter web parts that we can use to filter on-page data. We will go through all the filter web parts in this tutorial.
Setup Web Part Page for Filter web parts
Before we start, let’s complete some groundwork.
- Create a Web part page
- Edit page

- Add a list view web part on the page. This web part will be used as data to be filtered.
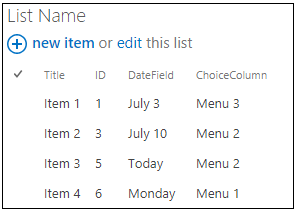
- Below is the screenshot of a list view web part having a Date field and a Choice field. We will use these columns in our examples.
- After adding list view web part we will now add a filter web part to filter list view data.
- Again Edit Page and click on Add a Web Part link.
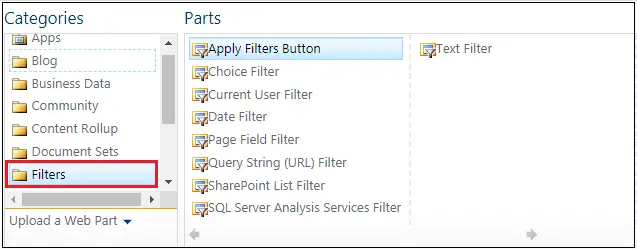
- In the Categories section, select Filters.
- You can see multiple Filter web parts on the right-side panel. We will go through each of them.
Text Filter Web part
Text Filter web part gives end users a textbox to enter a search term. After the user enters the value, the connected list view web part updates the results according to the search term.
- Add Text Filter web part on the page and Edit Web Part properties
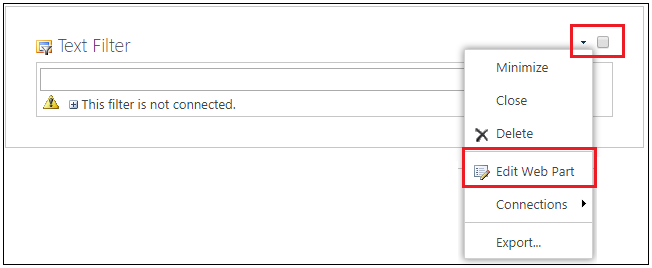
- In Edit web part properties, you will see a few options that you can leverage for the better use of the filter web part
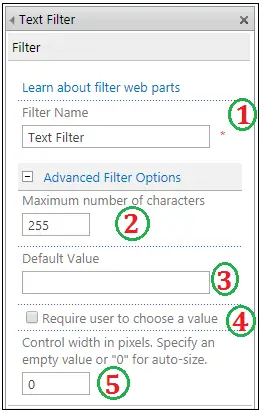
Text Filter Web part – Edit Web part Properties
- Filter Name: This is mandatory to enter. Whatever name you give over here, it will be displayed on the filter textbox on the page.

- Maximum number of characters: Maximum characters that you can use in the search textbox.
- Default Value: Whatever text you write over here, that will be set as default text and you would see that text appearing every time the page loads.
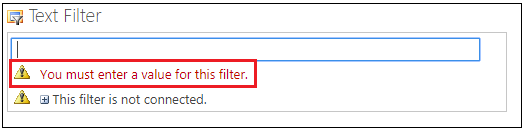
- Require user to choose a value: If you tick this checkbox, you will have to provide a value otherwise you will see a message like below.
- Control width in pixels: You can provide textbox width in pixels. If you keep the value blank or “0”, the system will auto-size the textbox.
Connect Text Filter Web Part with List View Web Part
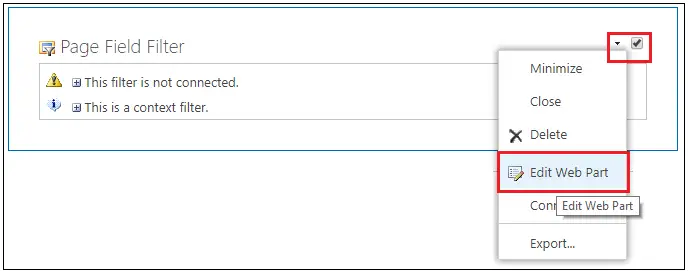
After setting the web part properties, it’s time to connect the filter web part with the list view web part. You can see a small alert message on Filter Web Part: This filter is not connected.

There are two ways to connect both the web parts. (1) Using Filter web part and (2) Using List View web part
- Using Filter web part:
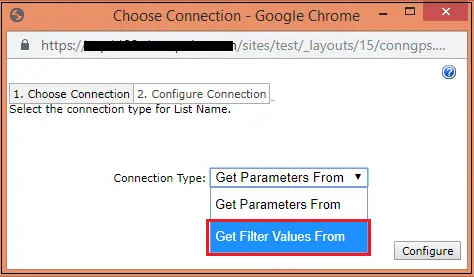
- On Filter Web part, mouse over Connections >> Send Filter Values To >> List Name (List view web part which is available on the same page). If there are multiple list view web parts on the page, you can select the web part that you want to set up a connection with.

- A pop up will appear asking to establish a connection. Click on Connection Type >> Get Filter Values From. Click on Configure.
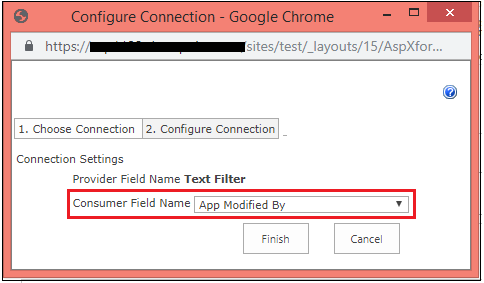
- In the second step of the process, you need to select a column from the drop-down, against which, the filter will be applied. Click on Finish to complete the connection.
- You can see a message – Sending values to: List Name.

- It means your connection is established and you are ready to use the filter Web Part.
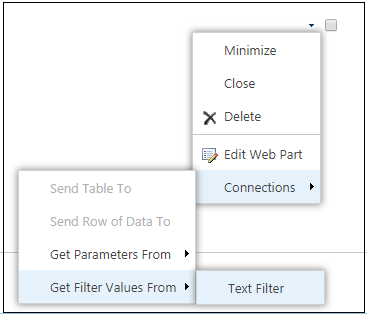
- Using the ListView web part:
- On List View Web part, mouse over Connections >> Send Filter Values From >> Filter Name (Filter web part which is available on the same page). If there are multiple filer web parts on the page, you can select the web part that you want to set up a connection with.
- Rest of the steps are same (go through: Using Filter web part above) to establish the connection.
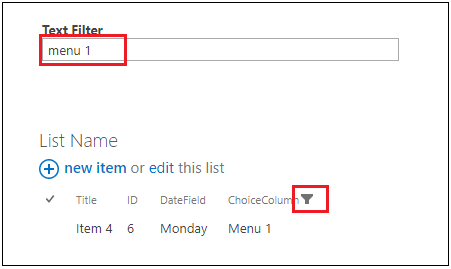
Test: Text Filter Web Part.
You can see a filter icon in the list view web part column (which is filtered)
NOTE:
- You can search only one column from list or library using Text Filter Web Part.
- You need to type the entire text value of the column. That means Text Filter Web part fires Equal query not Contains query.
- You can see in the screenshot above, you will have to type “Menu 1” to filter the result, only “Menu” or “1” will not filter the list view web part and give this result.
Choice Filter Web part
Choice Filter web part gives end users choices, to be picked from, as a search term. After the user selects the value from choices, the connected list view web part updates the results according to the search term.
- Add Choice Filter web part on the page and Edit Web Part properties.
- In Edit web part properties, you will see a few options that you can leverage for the better use of the filter web part
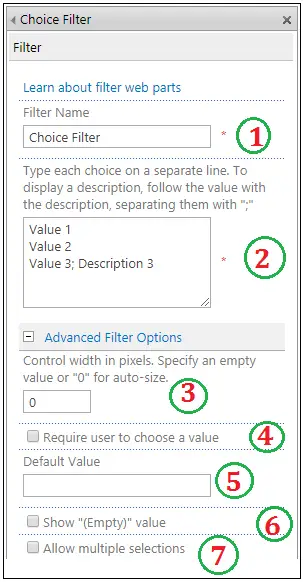
Choice Filter Web part – Edit Web part Properties
- Filter Name: This is mandatory to enter. Whatever name you give over here, it will be displayed on the filter textbox on the page.
- Choice Values: You need to enter each choice in a separate line. If you want to show the description instead of value, you can specify a value then “;” then description as shown in the screenshot.
- Control width in pixels: You can provide textbox width in pixels. If you keep the value blank or “0”, the system will auto-size the textbox.
- Require user to choose a value: If you tick this checkbox, you will have to provide a value of the filter.
- Default Value: Whatever text you write over here, that will be set as default text and you would see that text appearing every time the page loads.
- Show "(Empty)" value: If this checkbox is ticked, it will show an empty value in the choice collection.
- Allow multiple selections: If this option is ticked, the user will be allowed to select multiple values from the filter.
Connect Choice Filter Web Part with List View Web Part
The process of connecting the Choice Filter Web Part is same as of Text Filter Web Part.
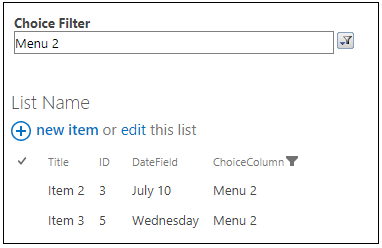
Test: Choice Filter Web Part
- Click on the filter icon which is besides choice text box.

- A popup menu will open. You can select a value to filter by. If you had selected Allow multiple selections while setting web part properties, you will get checkboxes and will be able to select multiple values else you will get radio button list and will be able to select only one value for the filter.

Final result…
Date Filter Web part
Date Filter web part gives end users a date picker textbox to enter or pick a date as a search term. After the user enters the date value, the connected list view web part updates the results according to the search term.
- Add Date Filter web part on the page and Edit Web Part properties
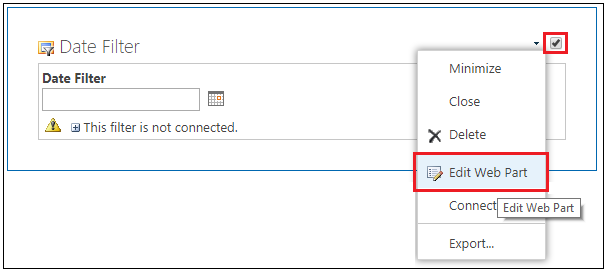
- In Edit web part properties, you will see a few options that you can leverage for the better use of the filter web part
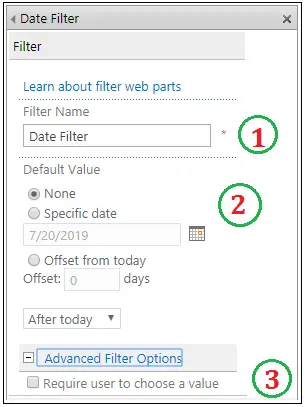
Date Filter Web part – Edit Web part Properties
- Filter Name: This is mandatory to enter. Whatever name you give over here, it will be displayed on the filter textbox on the page.
- Default Value: Whatever date you write over here, which will be set as default and you would see that date appearing every time the page loads.
- None: No default value
- Specific Date: You can specify a default date
- Offset from today: You can specify the number of days in Offset field and in the drop-down, you can specify either After today or Before today
- Require user to choose a value: If you tick this checkbox, you will have to provide a value I Filter web part.
Connect Date Filter Web Part with List View Web Part
The process of connecting the Date Filter Web Part is same as of Text Filter Web Part.
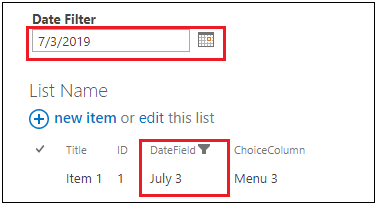
Test: Date Filter Web Part.
You can see a filter icon in the list view web part column (which is filtered)
Query String (URL) Filter
Query String (URL) Filter web part gives end users ability to pass search term via the query string and filter the web part results.
- Add Query String (URL) Filter web part on the page and Edit Web Part properties
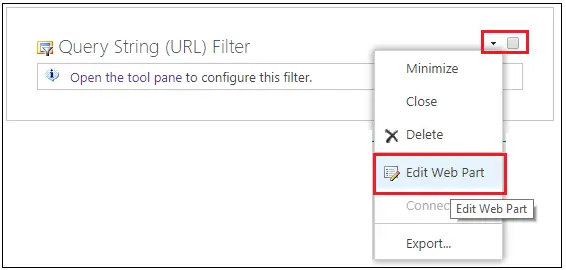
- In Edit web part properties, you will see a few options that you can leverage for the better use of the filter web part
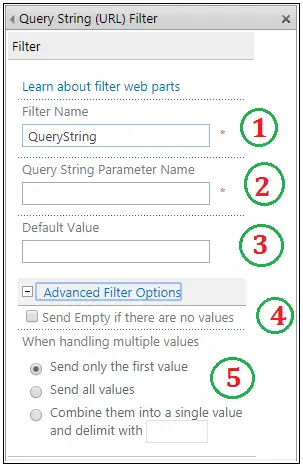
Query String (URL) Web part – Edit Web part Properties
- Filter Name: This is mandatory to enter. Whatever name you give over here, it will be displayed on the filter textbox on the page.
- Query String Parameter Name: This is Query string parameter name or Key Name
- Default Value: Whatever text you write over here, by default the list view web part will be filtered by this value
- Send Empty if there are no values: If you tick this checkbox, It will enable to search against a NULL value
- When handling multiple values: When you want to send multiple values.
- Send only the first value: Pass only one parameter value
- Send all values: Pass two or more parameter values
- Combine them into a single value and delimit with: Delimit value by a character. You need to specify the character in the textbox.
Connect Query String (URL) Filter Web Part with List View Web Part
The process of connecting the Query String (URL) Filter Web Part is same as of Text Filter Web Part.
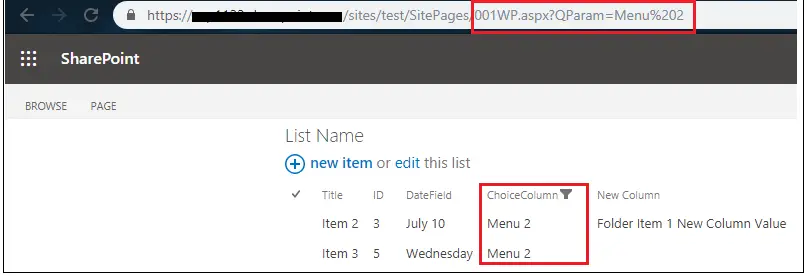
Test: Query String (URL) Filter Web Part.
You can see a filter icon in the list view web part column (which is filtered)
Note:
Query String (URL) Filter is a context filter. This filter sends the value of the QueryString parameter to connected Web Parts. It is only visible when the page is in edit mode.
Current User Filter
Current User Filter web part gives end-users the ability to search term via properties of the logged-in user and filter the web part results.
- Add Current User Filter web part on the page and Edit Web Part properties
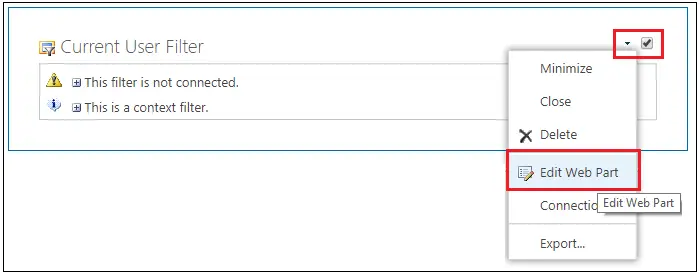
- In Edit web part properties, you will see a few options that you can leverage for the better use of the filter web part
Current User Filter Web part – Edit Web part Properties
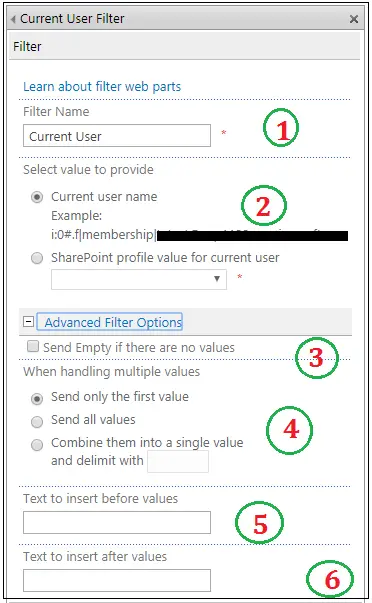
- Filter Name: This is mandatory to enter. Whatever name you give over here, it will be displayed on the filter textbox on the page.
- Current User Name: This will give current user name in the format specified as an example
- SharePoint profile value for current user: If you want to select other property of the current user, you can choose the same from the drop-down list. Most of the cases you would require to select Name property.
- Send Empty if there are no values: If you tick this checkbox, It will enable to search against a NULL value
- When handling multiple values: When you want to send multiple values.
- Send only the first value: Pass only one parameter value
- Send all values: Pass two or more parameter values
- Combine them into a single value and delimit with: Delimit value by a character. You need to specify the character in the textbox.
- Text to insert before values: Whatever you write here, will be added as a prefix in the value parameter
- Text to insert after values: Whatever you write here, will be added as a postfix in the value parameter
Connect Filter Web Part with List View Web Part
The process of connecting the Current User Filter Web Part is same as of Text Filter Web Part.
Test: Current User Filter Web Part.
You can see your list view web part data is already filtered with the current user.
Note:
Current User Filter is a context filter. This filter sends the value of the current user to connected Web Parts. It is only visible when the page is in edit mode.
Page Field Filter
Page Field Filter web part gives end-users the ability to search term via properties of the current page and filter the web part results.
- Add Page Field Filter web part on the page and Edit Web Part properties
- In Edit web part properties, you will see a few options that you can leverage for the better use of the filter web part
Page Field Filter Web part – Edit Web part Properties
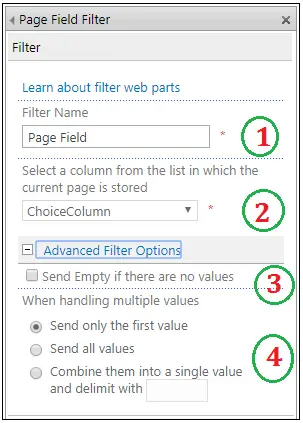
- Filter Name: This is mandatory to enter. Whatever name you give over here, it will be displayed on the filter textbox on the page.
- Select a column from the list in which the current page is stored: This is almost self-explanatory. You need to select a column from the drop-down. These columns are derived from the list in which the current page is stored.
- Send Empty if there are no values: If you tick this checkbox, It will enable to search against a NULL value
- When handling multiple values: When you want to send multiple values.
- Send only the first value: Pass only one parameter value
- Send all values: Pass two or more parameter values
- Combine them into a single value and delimit with: Delimit value by a character. You need to specify the character in the textbox.
Connect Page Field Filter Web Part with List View Web Part
The process of connecting the Page Field Filter Web Part is same as of Text Filter Web Part.
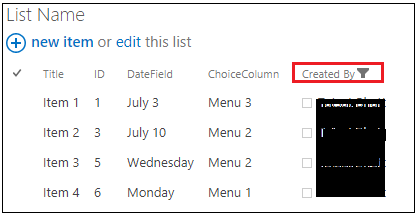
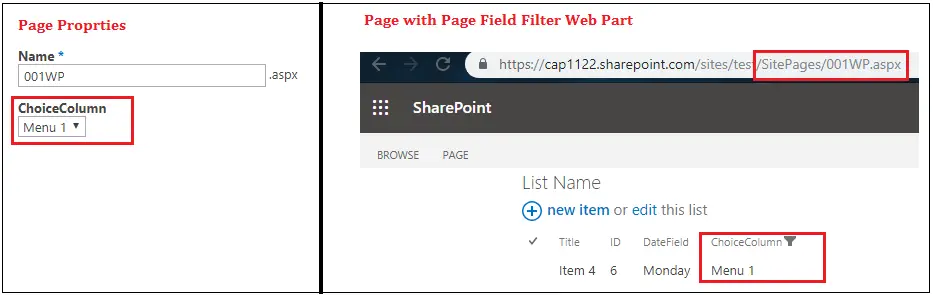
Test: Page Field Filter Web Part.
You can see your list view web part data is already filtered with Page Field Value.
Note:
Page Field Filter sends the value of the page field to connected web parts. It is only visible when the page is in edit mode.
SharePoint List Filter Web part
SharePoint List Filter web part gives end-users the ability to search term via SharePoint list values and filter the web part results.
- Add SharePoint List Filter web part on the page and Edit Web Part properties
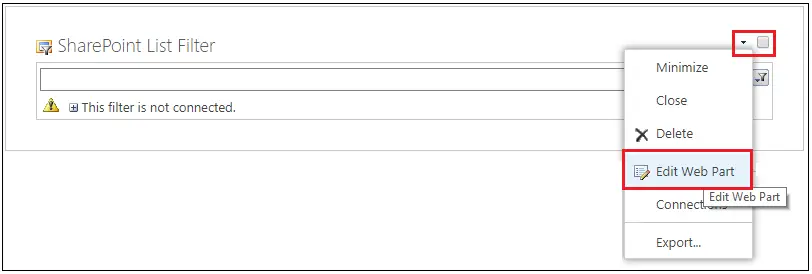
- In Edit web part properties, you will see a few options that you can leverage for the better use of the filter web part
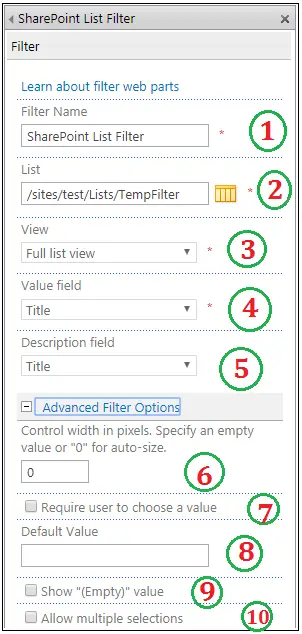
SharePoint List Filter Web part – Edit Web part Properties
- Filter Name: This is mandatory to enter. Whatever name you give over here, it will be displayed on the filter textbox on the page.
- List: Select the list from where you need to pull filter values
- View: Select the list view from which the filter column will be selected
- Value Field: Select the column which will be used as filter values
- Description Field: Select column description
- Control width in pixels: You can provide textbox width in pixels. If you keep the value blank or “0”, the system will auto-size the textbox.
- Require user to choose a value: If you tick this checkbox, you will have to provide a value otherwise you will see a message like below and filter textbox will be mandatory
- Default Value: Whatever text you write over here, that will be set as default text and you would see that text appearing every time the page loads.
- Show "(Empty)" value: If this checkbox is ticked, it will show an empty value in the choice collection.
- Allow multiple selections: If this option is ticked, the user will be allowed to select multiple values from the filter.
Connect SharePoint List Filter Web Part with List View Web Part
The process of connecting the SharePoint List Filter Web Part is same as of Text Filter Web Part.
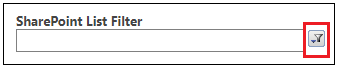
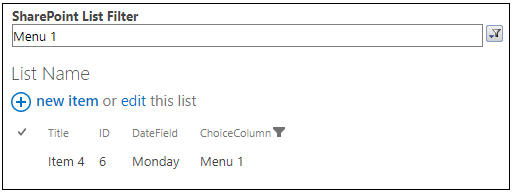
Test: SharePoint List Filter Web Part.
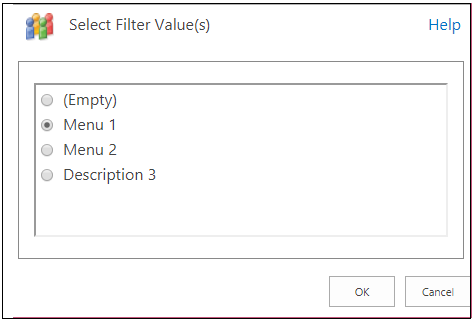
- Click on the filter icon which is besides choice text box.
- A popup menu will open. You can select a value to filter by. If you had selected Allow multiple selections while setting web part properties, you will get checkboxes and will be able to select multiple values else you will get radio button list and will be able to select only one value for the filter.
Final result…
Apply Filters Button Web part
If you add Apply Filters Button to a page then users will decide when to apply their filter choices. Otherwise, each filter is applied when its value is changed.
After adding Filter Button, results in the list view web part will only get filtered after the button is pressed.
- Add Filters Button web part on the page and Edit Web Part properties
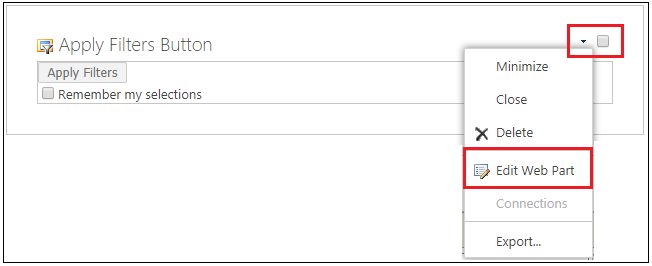
- In Edit web part properties, you will see a few options that you can leverage for the better use of the filter web part
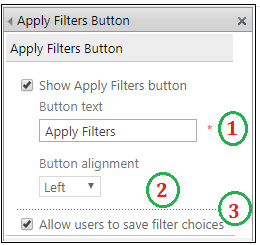
Apply Filters Button Web part – Edit Web part Properties
- Button Text: This is mandatory to enter. Whatever name you give over here, it will be displayed on the filter button on the page.
- Button alignment: Select the alignment for the button on the page from the drop-down.
- Allow users to save filter choices: If you tick this checkbox, you will see a checkbox on the page with Apply Filter button, which says Remember my selections. It will allow users to save filter choices.
Connect Apply Filters Button Web Part with List View Web Part
Apply Filters Button Web part works for each filter web part on the page. You do not need to connect it to any other web part separately.
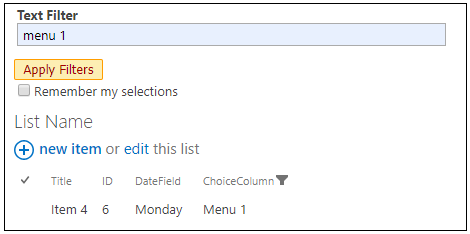
Test: Apply Filters Button Web Part.
- You can put any filter web part and connect to list view web part. You might have noticed, the moment you put value in the search textbox and press tab, List view web part filters with the value
- After you put Apply Filter Button on the page, the list view web part will only filters when you press the filter button.
Conclusion:
Filters Web Parts are extremely helpful OOB feature of SharePoint to filter on-page data without any custom coding. We have gone through all of the search web parts available in SharePoint Online.