In this article, we are going to learn about Microsoft SharePoint - External Sharing Feature. There will be a number of occasions when you require to share the SharePoint content to the user who does not belong to your organization. Let's see how you can activate and deactivate this feature, what content you can share, to whom you can share, and the other areas that you need to know to utilize the external sharing features.
External sharing can be controlled at two levels.
- Tenant/Organization level: Where you set the options for all the sites in your Tenant
- Site Level: Where you specify the settings at the site level.
Whatever you specify in the above two options, the setting which is least permissive will be applied.
Let’s see how we can make the settings for both options.
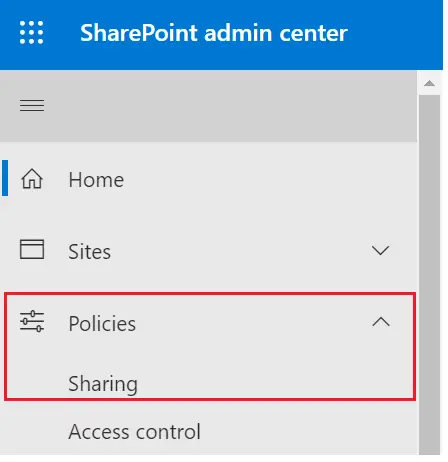
Activate/Deactivate External Sharing on Tenant level (SharePoint Admin Center)
Follow the steps to understand, how as an admin you can modify external content sharing settings from the SharePoint Admin Center on Organization/Tenant level.
- Go to https://tenantprefix-admin.sharepoint.com (SharePoint Admin Center).
- Click on the Policies >> Sharing
4 ways of Sharing/External Sharing
You can enable content sharing in 4 different ways.
Note::
The content sharing settings can be more restrictive for OneDrive than SharePoint but cannot be less restrictive than SharePoint.
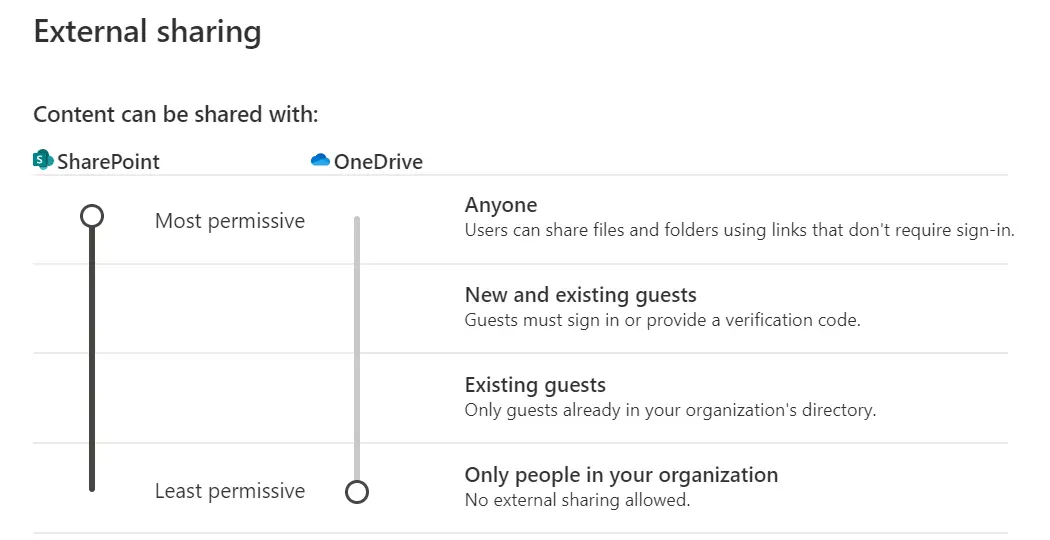
- Anyone:
- You can share the link with any internal or external user which is not even part of your organization neither the user is added in the Existing guests.
- The user will access the link as an anonymous user without giving identity.
- Using this option (Without identity), you can only share files and folders.
- To share the site, the user must authenticate itself.
- Along with this setting, you can also specify the number of days, after which the link will expire. You can specify the number at the time of sharing the file.
- New and existing guests:
- If the user is not from the organization, you can add a new user in Azure Active Directory.
- An email will be sent to the user. That user will be asked to create a Microsoft account.
- Shared Sites are accessed either by the Microsoft account or A work or school account only.
- Users having a Work or school account from another organization or Microsoft account will be added in Azure Active directory as a guest.
- Users having a non-Microsoft account, will not be added in Azure AD and have to add the verification code every time the user logs in.
- You cannot share a site to a non-Microsoft account, you can only share files and folders.
- Existing guests:
- This applies to the users who are already added in Azure Active Directory, as part of an earlier link share or directly added as a guest user in Azure AD.
- Only people in your organization:
- If you choose this option, no user will be able to share the content externally.
- You can share the content with the people within the organization only.
- This is the least permissive and most secure way of sharing the content to the users.
More External Sharing settings
There are 5 more advanced levels of sharing-settings that you can apply. We will go through all of them.
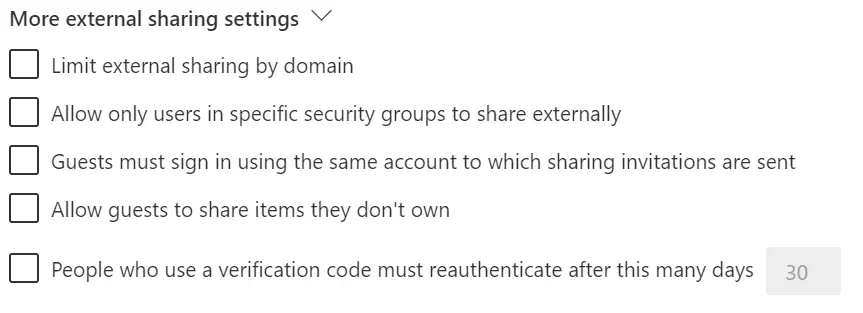
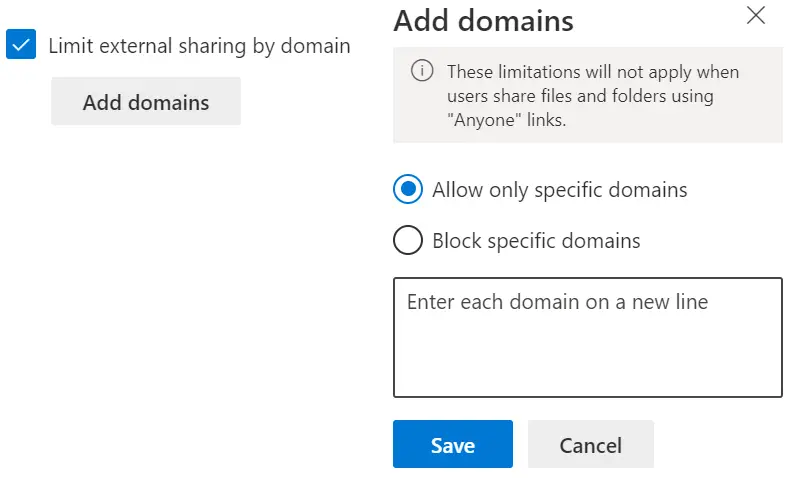
- Limit external sharing by domain.
- When you click this option, Click on Add domains. You will get a popup.
- Here, you can specify the domains that you either want to block or allow only specific domains.
- If there are multiple domains, you can put each in a new line.
- You can add maximum of 3000 domains.
- This functionality will not apply when users share files and folders using Anyone links.
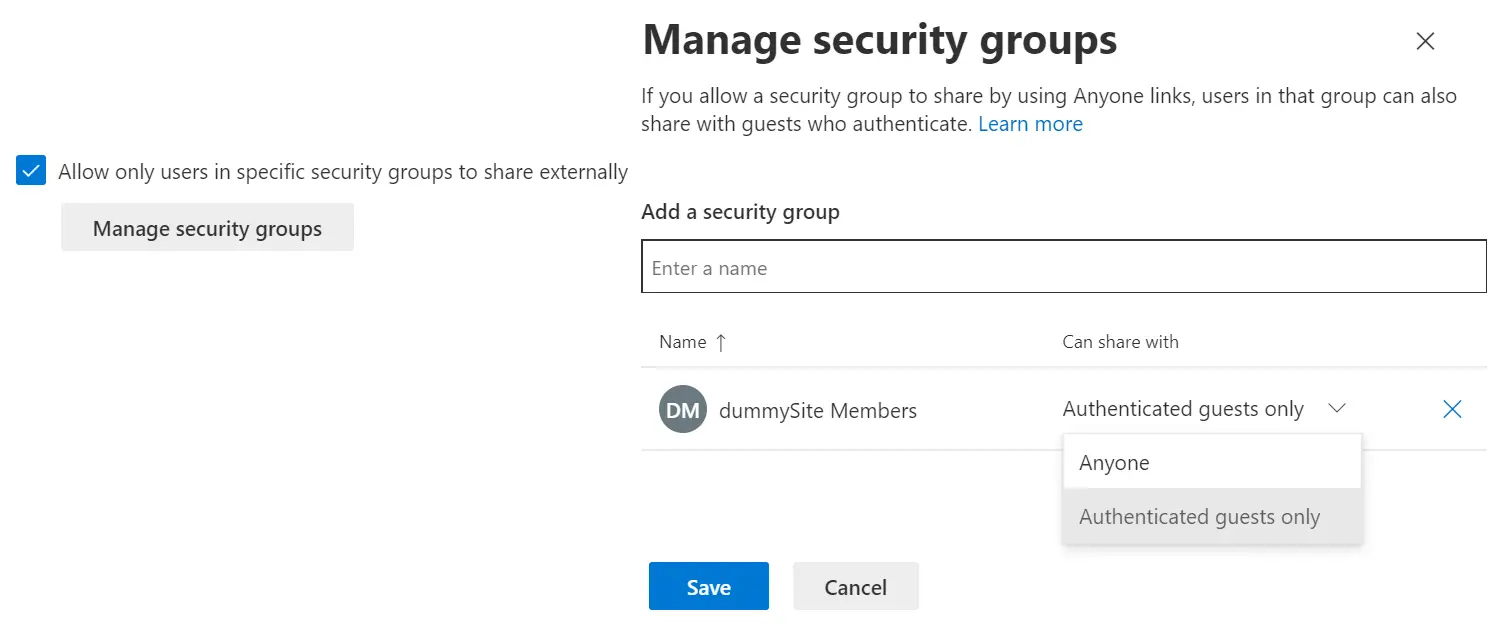
- Allow only users in specific security groups to share externally.
- After you enable this option, Click on Manage security groups. You will get a popup.
- Here, you can specify the groups, and only the users belong to these groups will be able to share the content externally.
- Each group has an additional setting. As shown in the screenshot, the Selected group can share content with
- Authenticated guests only:
- The group users can share with the users who authenticate themselves. So, before accessing the link, the user must verify its identity.
- Authenticated users can share with other authenticated users but cannot forward the links.
- Anyone:
- Users in the group can share the file or folder link to anyone and that user doesn’t require to pass the identity to access the link.
- You can add multiple groups over here.
- Guests must sign in using the same account to which sharing invitations are sent:
If you enable this option, the guest must use the ID on which the user has got the link of the file or folder.
- Allow guests to share items they don't own:
- By default, the user will be able to share the file or folder if the user has Full control permission.
- When you enable this option, the guests can share the content even if they didn’t create it.
- People who use a verification code must reauthenticate after these many days.
- Specify the number of days here.
- The guests who are using verification code authentication must re-authenticate themselves after the specified number of days in order to access the content.
File and folder links
There are some default settings that you can apply so that when the file or folder link is shared, by default it will take the following settings.
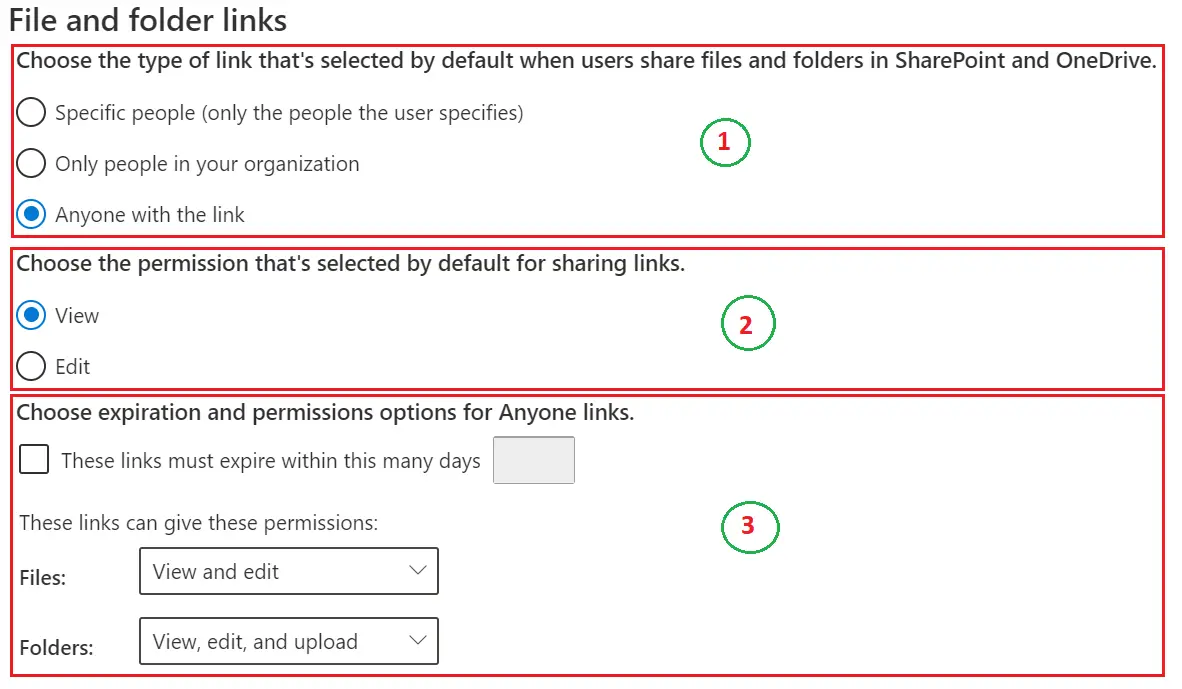
- Choose the type of link that's selected by default when users share files and folders in SharePoint and OneDrive: You can select any of the below three options, so when the user shares the link, by default that option will be selected.
- Specific people (only the people the user specifies)
- Only people in your organization
- Anyone with the link
- Choose the permission that's selected by default for sharing links:
- You can either select View or Edit permission.
- This is the permission level, the user will be having, to whom this link is shared.
- Choose expiration and permissions options for Anyone links: This setting is only for the Anyone links
- These links must expire within this many days: If you enable this, you can enter the number of days after which the shared link will be expired.
- These links can give these permissions:
- You can set the File permission to View or (View and Edit) and Folder permission to View or (View, Edit and Upload).
- If you don’t want an unauthenticated user to update your organization content, better you set this to View.
Other settings
There are some extra settings that you can apply to.
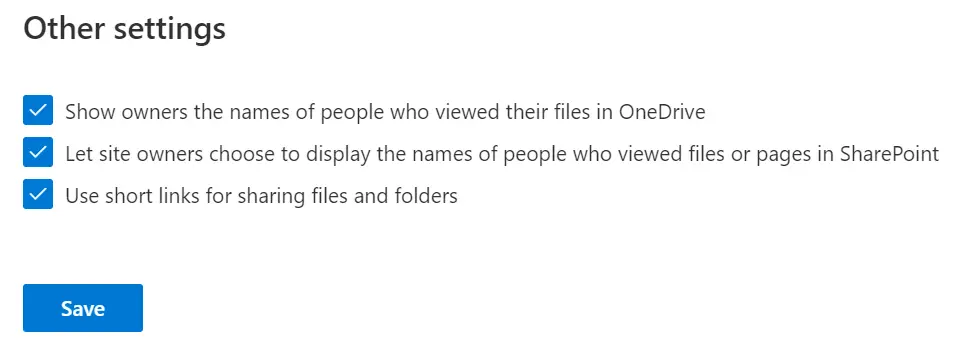
- Show owners the names of people who viewed their files in OneDrive: Self-explanatory… The owners will be able to see the name of the people who view the shared file or folder in OneDrive.
- Let site owners choose to display the names of people who viewed files or pages in SharePoint: This setting allows site owners to decide (on site level) whether the users having access to the file or folder can see all the viewers of that file (or folder). Basically, you can see who viewed that file.
- Use short links for sharing files and folders: You can share the shortened link. Let us know if you have used this option.
Activate/Deactivate External Sharing on a Site level (SharePoint Admin Center)
Follow the steps to understand, how as an admin you can modify external content sharing settings from the SharePoint Admin Center on Site level.
- Go to https://tenantprefix-admin.sharepoint.com (SharePoint Admin Center).
- Click on the Sites >> Active sites
- Click on the site, where you want to modify the external sharing.
- Pop up of the site setting opens.
- Click on Policies.
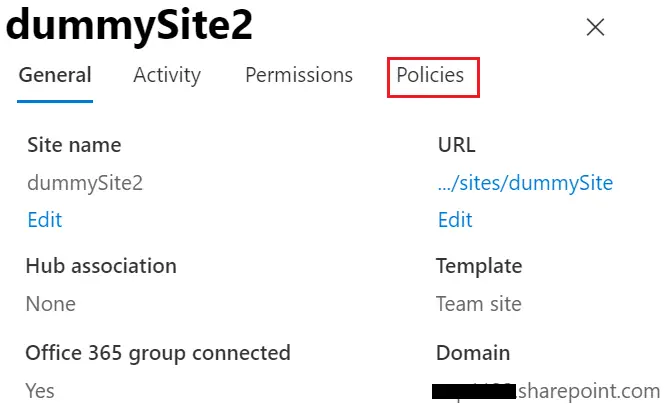
- In the External Sharing section, click on Edit.
- You will see the same set of options that we went through for the Tenant level in the above sections.
- At the end of the page, you will see an option - Reset to organization-level settings. If you select this, all your settings will be reset to the Tenant level settings.
How to Share a Site Externally
- Make sure the user is having a valid Microsoft account and the user is added as a Guest user in Microsoft Azure AD.
- You cannot just add/share the site with a user having any random domain.
- Click on the Share button from the top right corner of your site.
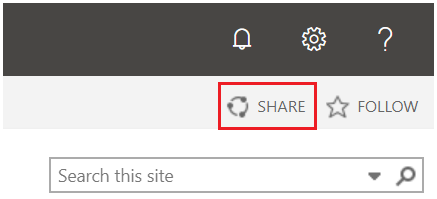
- A pop up will open and when you enter an external user, it will display a message stating the user is outside of your organization.
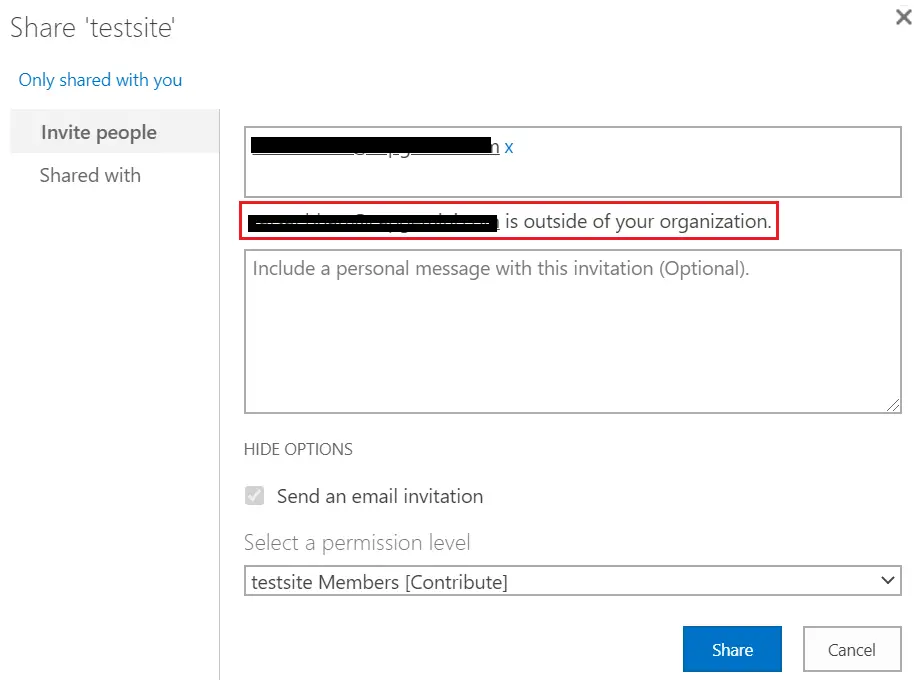
- By default, it will send an email and you can select the permission level for that user.
How to Share a File or Folder Externally
- Click on the ellipsis of a file or folder and click on Share.
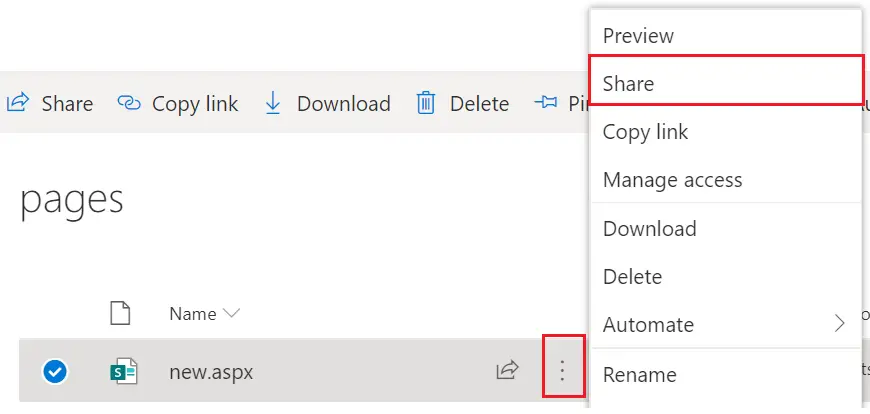
- When you click on share, a popup opens (screen 1 in below screenshot). You will see the default sharing option here.
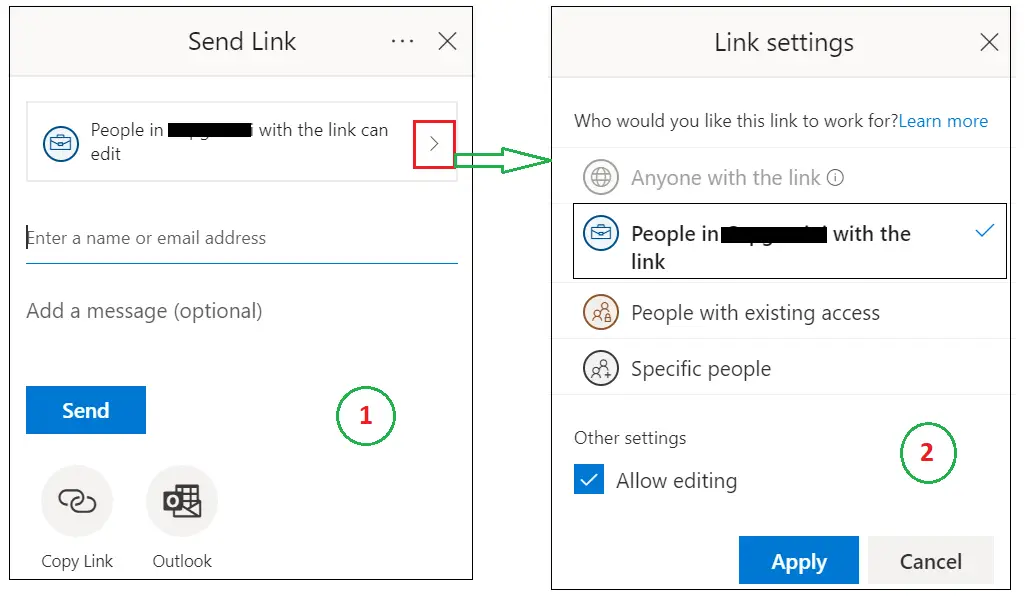
- Click on the arrow and it will open a new screen (Screen 2 in the screenshot).
- Here, there are four options.
- Anyone with the link: This is used to give access to anyone you specify the email of. That includes the users outside your organization too. Note: this option is not available in SharePoint Server 2019
- People in [organization] with the link: This is used to share to the users within your organization.
- People with existing access: This is used to just send the link to the users who already have got access to this link.
- Specific people: This option gives access to the user you specify, others who already have access will still be able to use this link.
Get a File and Folder Sharing Report in SharePoint
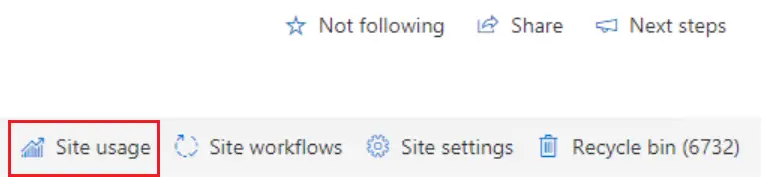
- Go to your Site >> Site Content
- On the Site Content Page, click on Site usage from Top right corner.
- Shared with external users: The content which is shared with external users.
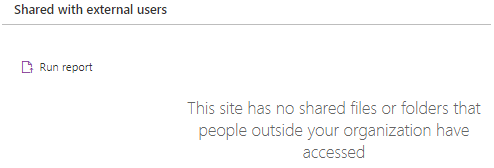
- Click on Run report. It will ask you to create a directory.
- Save the report. It will be saved in CSV format.
- It will contain information like:
- Resource Path: URL of the item
- Item Type: File, Folder,etc..
- Permission: permission level of the user on the item
- User name: Name of the user or group that has access to the link. If this is a sharing link, the user name is SharingLink
- User Email: Email of the user or group
- User or Group Type: The type of user or group: Member (internal), Guest (external), SharePoint group, Security group, or Microsoft 365 group. (Note that Member refers to a member in the directory, not a member of the site.)
- Link ID: GUID of the link-sharing link if the user name is Sharing Link
- Link Type: Type of link (Anonymous, Company, Specific People) if the user name is Sharing Link
- AccessviaLinkID: The Link ID used to access the item if a user's permission to an item is via a link
Note:
- If any of the options are greyed out, that means it is disabled by your system administrator from the SharePoint admin panel.
- If you enable Allow Editing as shown in screen 2, the user will also be able to modify the content to whom you are sharing the link.
- Once you’re done with selecting your option and apply, you can also Copy the link or share the link via Outlook as shown in Screen 1.
- Anyone having full control on the Site can share the site and the other users can only share files or folder.
- No any user activity will be logged in the External Sharing option – Anyone but their IP Address are recorded in the audit logs.
- You should refrain from sharing the content of your organization using External Sharing option - Anyone.
- You can probably create a site where you only keep the documents and content which is meant to be shared with anonymous users. On such site, you can enable Anyone sharing and share the link.