Latest Posts

3 ways to implement SharePoint Calendar Overlay

The calendar is one of the very essential and widely used features in SharePoint. In any SharePoint application, the organization might be using more than one calendar for different purposes like vacation plans, attendance, leave plans, etc… It will be very helpful if we can combine multiple calendars into a single location. Let’s find out different ways to do it.

What is SharePoint Calendar Overlay?

Calendar Overlay is the feature in SharePoint which allows you to add, additional calendars in the existing calendar. By doing this, you can easily view events from multiple calendars in one place.

How to Create Calendar Overlay in SharePoint?

  • Go to your SharePoint calendar list.
  • From Ribbon, click on CALENDAR >> Calendars Overlay
  • SharePoint Calendar Overlay navigation
  • On Calendar Overlay Settings page, click on New Calendar
  • Calendar overlay settings
  • A form will open with a few options for new overlay settings. Calendar overlay settings form
    • Name and Type: Specify the Name of the calendar and type of it.
      1. Calendar Name: Write the new calendar name over here
      2. The type of the calendar: Here you can specify wither SharePoint or Exchange calendar
    • Calendar Overlay settings: Specify the settings of the new calendar so that you can easily identify the events of the other calendar.
      1. Description: Specify the description of the new overlay calendar
      2. Color: Specify the color for events in this calendar
      3. Web URL: Specify the site URL from where you want to fetch the additional calendar. Click on Resolve.
      4. List: Specify the calendar list which you want to add in the SharePoint Calendar overlay.
      5. List View: You can also specify the exact view so that only those/filtered data will be available in this calendar overlay.
      6. Always show: If you want the overlaid SharePoint calendar to always display in the SharePoint group calendar, select Always Show. When Always Show is not checked, you will be able to turn different overlay calendars on and off from the page. If it is checked, the overlay calendar will always appear on the page's calendar. Reference for this description from Microsoft Article.

        Note:

        • The SharePoint calendar that you want to overlay should be from the same site collection.
        • You can add maximum 10 calendar overlays in SharePoint
  • You can now go to the main calendar and see the other calendar events are also included.
  • You can distinguish the other calendar events by the color you specified in calendar overlay settings.
  • overlaid sharepoint calendar
  • As you can see, the Overlay Festival events are color-coded differently
  • You CANNOT modify or delete the other calendar events from here.
  • An overlay is just for displaying the events not for modifying or deleting the events from the other calendar.

How to Create a SharePoint Task List Calendar Overlay?

  • Create a Task List
  • As you can see, tasks list by-default comes with a Calendar view.
  • task list calendar navigation
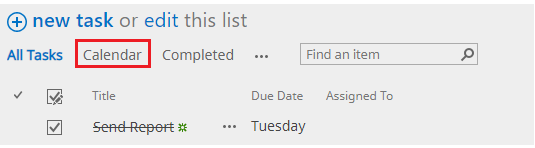
  • You capture a task with the defined date and the same DateTime column will be used in calendar view and which is eventually used in Calendar overlay.
  • Now, go to the first list where you want to add a calendar overlay.
  • Go to Ribbon and click on Calendars Overlay.
  • Here you can add one more overlay.
  • In the List and List View options of the overlay settings, you need to specify the Tasks list and Calendar view respectively.

How to Create SharePoint List/Library Calendar Overlay?

  • If you want to create an overlay using a list or library data, then you need to create a Calendar view in that list.
  • First, create a Calendar view and select which date field you are going to pick for calendar display.
  • As shown in the screenshot, please select the appropriate column for Time Interval: which is used to place items in the calendar and Calendar Columns: which is used for Month, Week and day view Titles.
  • calendar view setting for list calendar overlay
  • Once the view is created, go to the list where you want to add a calendar overlay.
  • Go to Ribbon and click on Calendars Overlay.
  • Here you can add one more overlay.
  • In the List and List View options of the overlay settings, you need to specify the List and Calendar view respectively.
  • You can see four calendars are displayed using the SharePoint Calendar Overlay feature. If you have assigned a proper color to each calendar, then it will be very easy to identify each of them in the calendar.

    On the left-hand side you can see the Overlay title making it easy to identify which overlay is having which color.

    different types of sharepoint calendar overlays

How to change the SharePoint Calendar overlay color and other settings?

In the above example, we have taken two calendars. (1) Leave Plan (2) Festival.

Requirement: Leave plan is the main calendar and Festival is added as an overlay in Leave plans. Now, change the setting of the Festival overlay.

  • Go to Leave Plans calendar (as this is the holder of the festival calendar overlay)
  • Click on Ribbon >> click on CALENDAR >> Calendars Overlay.
  • The calendar overlay settings page will open. Here you will be able to see all the calendar overlays added for this calendar.
  • Calendar overlay settings page
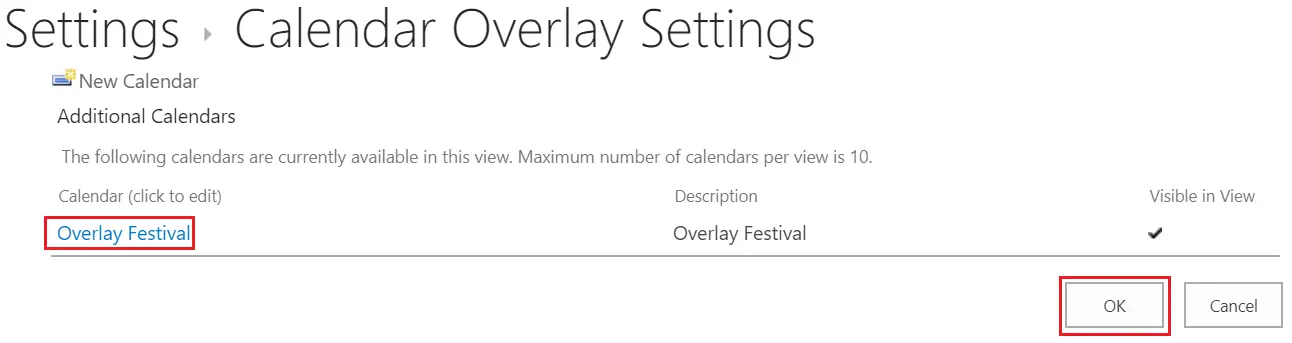
  • Click on the overlay that you want to change the settings for.
  • Now, you can change the color or any other settings of the calendar overlay and click OK.

We value your Feedback:

Page URL:

Name:

Email:


Suggestion:

© 2024 Code SharePoint