In this article, we are going to go through all the areas of the Power Automate and how to use them. We will understand about Triggers, conditions, actions, connectors, flow Logs, etc. We have tried to explain each aspect of MS Flow in detail so the article is going to be a bit lengthy. Please read till the end, for complete understanding.
You can get some basic understanding of the Power Automate. That will surely help you to understand this article easily.
Flow Portal
Login to o365 portal >> Select Power Automate.
Once you arrive on the Flow Portal, you will see three options there.
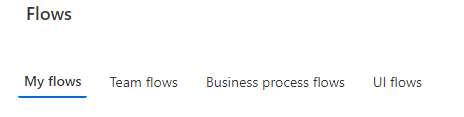
- My Flows: These are the flow created by you but you haven’t shared with anyone.
- Team Flows: These are the flows that you have shared with someone or someone has shared with you.
- Business process flows and UI flows: These are the advanced level flows. We will create separate articles to cover them.
Approval Center
In the flow portal, click on the Approvals from the left menu to navigate to the approval center.
Approval center is the place where you will see all the flows which are pending for your approval or you have sent for approvals.
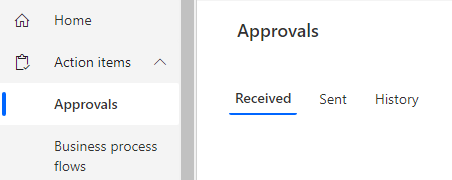
Also, you can check your flow approvals history in the History tab.
Microsoft Flow Templates
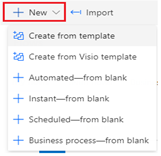
- The first two options in the screenshot are the ready-made templates using which you can directly start creating a flow.
- There are four types of flow that you can start from scratch. Last four options in the screenshot
We have mentioned all the 6 options below.
When you go to the Power Automate portal, click on New.
Option 1: Create a flow using the template
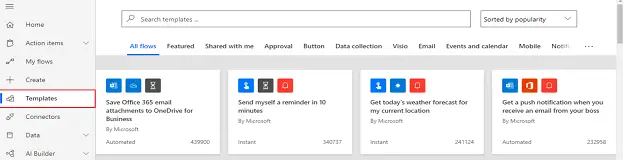
- In the Power Automate portal, from the left hand side, you can click on Templates.
- A number of templates will be presented to you to choose from.
- You can select one which best fits your requirement and you can then modify or directly start using it.
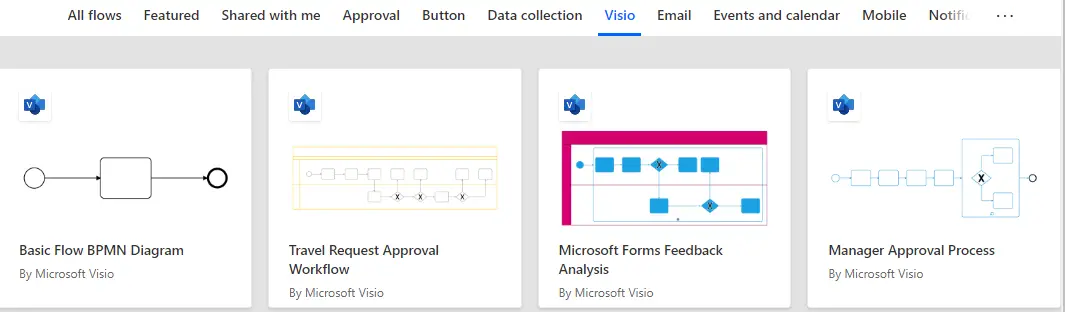
Option 2: Create from Visio template
- Click on the second option.
- You will be presented with multiple Visio templates.
- You can create an MS flow using one of these Visio templates
Option 3: Automated-from blank:
- You can choose this type of trigger if you want your flow-actions to be automatically triggered on some action.
- That action can be like when an item is created in SharePoint, a mail arrives in Inbox, a file is created, a record is deleted or updated, and so on.
- You can go here and find your selves. There are so many options available.

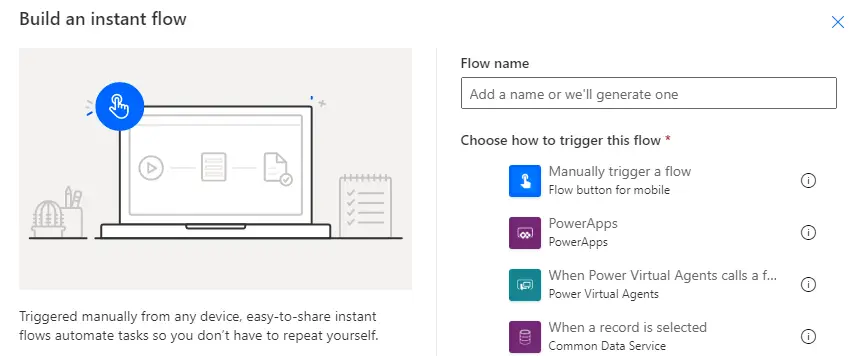
Option 4: Instant-from blank:
- This type of flow gets executed when you manually start them
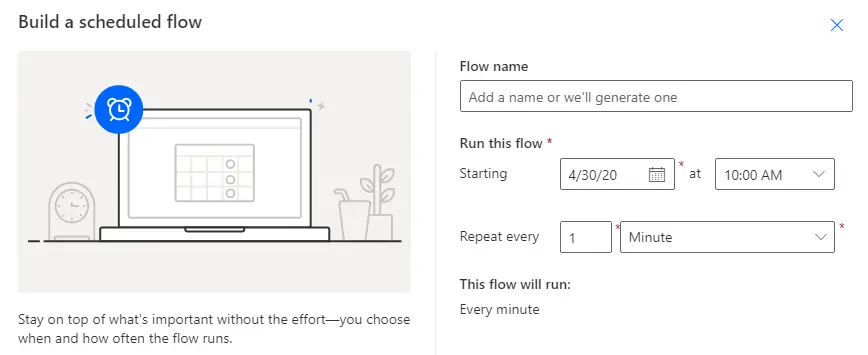
Option 5: Scheduled-from blank
- You can go for this template if you want your workflow to trigger on a fixed time slot.
- As you can see in the screenshot, you can set the time of the flow to run, and based on that the flow will start.
- You can also set the repeat timing of the flow.
Option 6: Business Process-from blank:
- This type of flow runs through stages.
- Each stage represents a step of the flow.

Trigger
The trigger means to start or activate. We need to add a Trigger as a first step for creating any type of Microsoft flow.
In any of the flows, Trigger must be used as a first step, and the trigger is used only once per flow.
You can trigger a flow either manually or it can be triggered automatically.
- Manual – The flow will start only if someone manually starts it.
- Examples:
- File / Record / Row Item is selected.
- User presses a button of an app to start a flow
- Automatic – The flow will start once any triggering action occurs.
- Examples:
- File is created/updated/deleted.
- Scheduling of flow on specific time.
Action
Action is the set of tasks that you want your flow to perform. There can be one to multiple actions in one flow.
Examples:
- Create a File
- Send an Email or SMS
- Update SharePoint List Item
You can choose from the set of actions as mentioned in the screenshot.
Condition
You can also specify a condition and based on the condition’s output you can perform your workflow tasks.
Example: As shown in the screenshot, if the content length is less than 500 chars then it is performing a different task and for else condition, it is performing different tasks.

Connectors:
The connector is a proxy service that can be used with Microsoft Flow. Once connected with Microsoft Flow, all the connectors' capabilities can be utilized in the flow.
Some of the very popular connectors are Salesforce, Office 365, Twitter, Dropbox, Google services, and more. You can refer: list of all supported applications/connectors in Microsoft Flow
Microsoft Flow Administration
Open your flow. You will see a few options here. Let’s understand all of them.

Please refer screenshot for the sections.
Section 1:
- Edit: Edit your already created flow
- Share: Add a user or group as the owner. Adding another owner allows others to edit, update, and delete this flow. All owners can also access the run history and add or remove other owners
- Save As: Create a copy of this flow and add it to your My flows page. You can rename it first if you want. It’ll be turned off by default.
- Delete: Deletes your flow
- Send a Copy: You can send a copy of this flow to anyone else so that he can use this flow to create another flow for his use.
- Submit as template: After a successful test run of the MS Flow, you can give Microsoft permission to submit your flow to the public gallery using this action.
- Export: You can export your flow in .ZIP or .JSON format. This action is particularly useful when you want to move your MS flow from one environment to the other.
- Analytics: As the name suggests, this option gives you analytics about how many times the flow ran and usage analytics.
- Turn On/Off: This action turns Off or On your MS flow.
- Repair tips off: It gives alerts about the health of the flow. If you disable this option, you’ll have to personally visit the Flow dashboard to check the flow’s health.
Section 2: This section displays the details about the flow like
- Flow Name
- Owner of the flow
- Status of the flow (ON / OFF)
- Flow Creation and modification date
- Type of the Flow
- A plan under which flow is created.
Section 3:
Runs: This section shows all the executions of the current flow. It will show three properties of the flow.
- Start Datetime of the flow
- Duration of the Flow (How much time it took to complete the flow)
- Status of the flow (success / Fail)
Section 4:
Connections: All the connections, which are used in the flow, are listed here.
Section 5:
Owners: all the owners of the flow are listed here.
Flow action administration
You will find an ellipsis at the end of each action in the flow.
If you click on that, you will see a pop up that is used to manage the particular action.
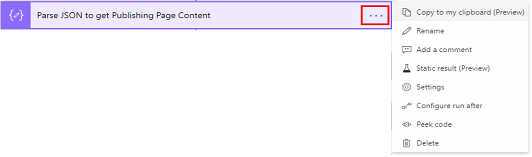
- Copy to my clipboard (Preview): This is a simple Copy action of copy and paste. You can paste this action to anywhere else in the flow.
- Rename: It is a good practice to change the name of the action rather than keeping the default one. It will be easy to understand the flow if we keep the proper naming convention of the flow actions.
- Add a comment: You can write some descriptions of the action.
- Static result (Preview): You can set output in static result, so that flow will run your output and not the actual output from this action. This way you can test your flow with various data. Detail info on Static Result
- Settings: You can govern your action using this settings menu. There are a few options like manipulating Input and output, Retry policy, Asynchronous pattern, Timeout. All these options are based on the connector, of which, the settings menu you have opened.
- Configure run after: It lets you select when the next action should fire. If the current action is successful, it is failed, is skipped, or is timed out.
- Peek code: When you select this option, you will see the full JSON representation of an action
- Delete: Delete the action
Please let us know if you want any specific area of Power Automate to cover or you want us to write any specific MS Flow example.